

DJI Mavic Air 2 IMU, Compass & Gimbal Calibration

When the drone is drifting without wind present, or hovering at some angle, its because it needs IMU calibration. If IMU is not set correctly, it can cause flyaways or gimbal problems, and for that reason, it’s very important that you calibrate your Mavic Air 2 to have a stable flight. Therefore, in this article, we are going to break down step-by-step on how to calibrate the Mavic Air 2 compass, Gimbal and IMU. This is a very easy procedure and you will have no problems on doing it on your own.
The quick instructions process for calibrating the DJI Mavic Air 2 IMU are as follows:
- Find a dry level surface.
- Turn on the Mavic Air 2, RC and go to the DJI Fly app.
- Inside the settings menu, tap on “Safety” tab.
- Scroll down under “IMU”, and then tap on “Calibrate”.
- Follow the instructions that will be displayed on the screen to proceed with calibration.
These instructions are only the condensed version, but a complete guide you’ll find below. Before you start the IMU calibration process, you first need to understand what an IMU is and when it is needed. So let’s start.
What is an IMU?
An IMU (Intertial Measurement Unit) is an electronic device (sensor) that measures and reportsangular rate and force such as speed and acceleration using a combination of gyroscope, accelerometers, and in some cases magnetometers. You can find IMU in mobile phones, drones, VR headsets, and in many other electronics. This is why the IMU is important when it comes to drones because it allows your aircraft stable flight. It uses calibrated compass together with a GPS system.
Every drone has a flight controller, and its role is to store the information from the IMU and to pass that information to the ESC’s (electronic speed controllers). After the ESC gets that information, he will then speed up or slow down the drone to maintain a stable flight.
If you want to know How To Calibrate DJI Phantom 4 IMU, check this article.
DJI Mavic Air 2 Compass, IMU & Gimbal Calibration

1. Mavic Air 2 Compass Calibration Steps
Here we will go through the step-by-step guide on how to calibrate the DJI Mavic Air 2 Compass:
- Find the open area outside (preferably a large yard, with no trees, cars or buildings).
- Place your Mavic Air 2 on the ground and turn it on together with DJI Fly app on your RC.
- On your remote controller, find the 3 dots that are in the top right corner and tap on “Safety”.
- Now scroll down to the “Sensors”, select “Calibrate” and confirm with “Start”.
- When the indicator lights blink yellow on your Mavic Air 2, it’s a signal that the calibration is about to start.
- Put down your Controller and just follow the onscreen instructions.
- Make sure to hold your Mavic Air 2 horizontally and rotate the drone 360 degrees in the clockwise direction.
- When you notice the lights on your Mavic Air 2 change from yellow to green, then it is time to start the vertical calibration.
- Take your Mavic Air 2 and hold it vertically so its nose is pointing upwards and rotate the drone 360 degrees around its vertical axis.
- Also, the indications on your Mavic Air 2 will turn solid green when you successfully complete this step.
- If you have successfully completed horizontal and vertical compass calibration, the indicator light will flash in green on your Mavic Air 2.
Note! If you notice that your Mavic Air 2 indicator lights are blinking red and yellow, that means that calibration has failed. Be sure that there are not electromagnetic interference in the area where you calibrate your drone.
2. Mavic Air 2 IMU Calibration Steps
Before you start the IMU calibration process with your DJI Mavic Air 2, be sure to find a dry flat surface (Very important). Also charge the battery on your drone and you’re ready to begin.
Here is the step-by-step guide on how you must calibrate the Mavic Air 2 IMU:
- Place your drone on a dry flat surface, turn it on, with its arms closed in.
- On your Remote Controller of the DJI Fly App, find the 3 dots that are in the top right corner and tap on “Safety”.
- Under the “Safety” tab, find the “Sensors” section and select “Calibrate” and the app will take you to the screen section with instructions.
- Tap on “Start” and follow the instructions for IMU calibration.
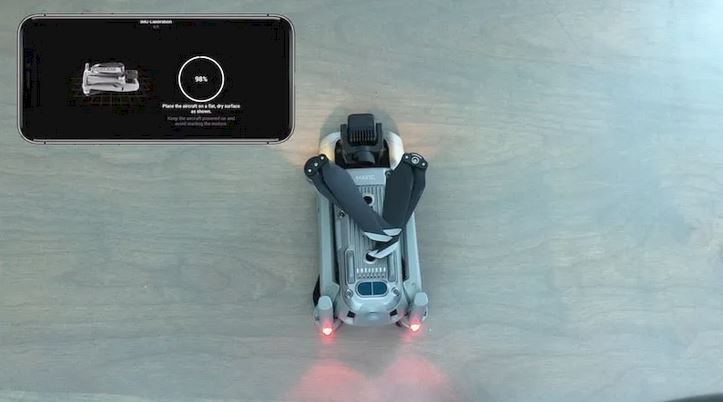
- Start the calibration process by placing your Mavic Air 2 on its belly (with the arms folded in), and wait that calibration go to 100%. The LED lights will flash green after the process is complete.
- Next step is to place the Mavic Air 2 onto its right side and wait the calibration to go to 100%. Also, LED lights will flash green after the process is complete.
- Now place the Mavic Air 2 over to the left side and wait the calibration to go to 100%. The LED lights will flash green after it is completed.
- Stand the Mavic Air 2 up on its rear end and wait the calibration to go to 100%. After it’s completed the LED lights will flash green.
- Last step is to flip the Mavic Air 2 upside down, so the camera is pointing up. Wait for the calibration to finish, and the drone will automatically restart.
How To Calibrate Mavic Air 2 IMU & Compass (Video)
If you prefer to calibrate your drone by following the instructions via video, here we have put an excellent youtube video with all the steps on how to calibrate the Mavic Air 2 compass and IMU.
https://www.youtube.com/watch?v=IDMTwVG5aK8
3. Mavic Air 2 Gimbal Calibration Steps
Last but not least is gimbal calibration. Just follow this step by step process for your Mavic Air 2:
- Make sure to place your Mavic Air 2 on a dry flat surface.
- Turn on the Mavic Air and your Remote Controller.
- On your Remote Controller find the 3 dots that are in the top right corner and tap on them.
- Tap on “Control”, scroll down and find the “Gimbal Calibration” and enter it.
- Now you need to tap on “Auto”, and the Mavic Air 2 gimbal calibration process will proceed.
- After it is completed, you will get the notification “Calibration successful” in the Fly app.
When Should You Calibrate the Mavic Air 2?
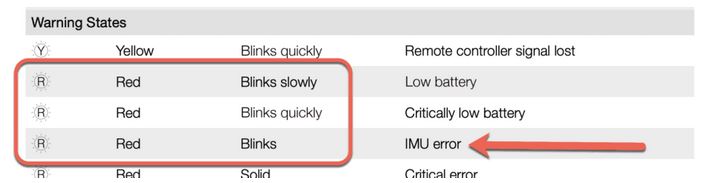
You probably want to know when it is important to calibrate your Mavic Air 2? By reading the Mavic Air 2 manual, you will notice the “IMU” letters exactly two times. The first time is when DJI gives you a status indicator light where you will notice red blinks that indicate an IMU error, while the second time is when the status indicator is telling you that the calibration section is in the Fly app.
Keep in mind that DJI doesn’t directly say “if the status indicators are blinking red, calibrate the compass”. Therefore, I can tell you from my previous experiences, where I have more than 6 years of work in the drone industry when I would recommend that you calibrate your Mavic Air 2 IMU.
- After you purchase the Mavic Air 2. Once you bought your drone, it traveled a very long way to get to you and was probably disrupted during the flight and transportation. So, I suggest that you do an IMU and compass calibration after you charge your drone, and start your first flight.
- When you notice status lights are blinking red. Once you notice a status indicator light on your Mavic Air 2 that is blinking red, it means that you definitely need to calibrate the IMU. Keep in mind that if the battery level is low, that it can also cause the indicator lights to blink red. On the picture below you can see when red indicators are present.
- If the Fly App prompts you to calibrate. Sometimes the DJI Fly app gives you a notification that you need to calibrate your drone. Don’t ignore this warning. In the settings you can also check the current status of the IMU in the “Safety” tab, and see if the status is “IMU normal”.
- If you had a hard landing or a crash. If it happens that your Mavic Air 2 crashed or had a forced landing, then it is advisable to calibrate the IMU. No matter that there are no errors, do this to be sure.
- When you are flying in a new location. If you are flying with your Mavic Air 2 to a new location, where the distance is more than 31 miles (50 km), it would be desirable to perform a calibration.
Note: If you still have warranty on your Mavic Air 2, contact them and tell them about your problem or just contact the DJI Support.
How Long Does IMU Calibration Take Mavic Air 2?
The calibration process for DJI Mavic Air 2 takes about 30 seconds to complete from start to finish. The process is done inside the DJI Fly app and once you start the process, the diagram will pop up that will show you how you need to position your drone to complete the required steps.
I also wrote the DJI Phantom 3 IMU Calibration tutorial that you can read if you have problems with this drone model.
DJI Mavic Air 2 Secure Policy
If you didn’t know, DJI Mavic Air 2 is offering the Care Refresh where it provides two replacement units, where you need to pay only small additional charge in the first year. Not calibrating your Mavic Air 2 successfully, an accident can happen very easily and your drone can be damaged. Click on the below link to know more about this offer and FAQ.
Mavic Air 2 Care Refresh
Final Thoughts
As you could see in this article, IMU calibration is very easy and quick, so there is no need to avoid it. Now that you have seen and learned how this process is done when it is needed, you are free to consider yourself an expert. Keep in mind that IMU calibration is required, and if you avoid your drone it may lose orientation during the flight which is bad. I hope we helped you, and if you have any additional questions email us.