

How To Calibrate DJI Phantom 4 IMU? Complete Guide

The DJI Phantom users sometimes wonder how to calibrate their IMU and what exactly serves IMU calibration? There is no need to talk a lot about how important is IMU Calibration to the Phantom series. The need for IMU calibration and to know how to properly calibrate your Phantom 4 is an important thing for every DJI user. So if you notice that your Phantom 4 is drifting and does not stick best in the air, then it’s time for IMU calibration. So let’s begin.
How To Do IMU Calibration for DJI Phantom 4? IMU Calibration procedure for Phantom 4 consists of a preparation and main calibration process that is divided into 5 steps. Phantom 4 must be placed on flat surface before the calibration starts. Next step is to connect RC with your mobile device and start the process. Calibration requires approximately 5 to 10 minutes.
Note: Phantom 4 & Phantom 4 Pro (p4p) have different IMU calibration procedure. In this article we will describe calibration process for both models in step-by-step guide.
Phantom 4 Pro (p4p) requires a slightly different procedure which we will explain below. To make things easier for yourself, it would be advisable to print the IMU calibration process out on paper and take it with you as a reminder. Keep in mind that sometimes there will be an error during calibration and you will have to perform this procedure with your Phantom 4 several times. So let’s take a look at how the IMU works and what to do.
What Is The IMU And Why Is Important?
The IMU (Inertial measurement unit) plays a very important role, because it determines your quadcopter position in space. This electronic device measures and reports the specific forces it receives, the angular velocity, and the attitude of an object (including its stroke angle, pitch angle and roll angle) using the data from 4 separate components: an accelerometer, a gyroscope, a thermometer and a barometer. If this is not set up correctly, there is a good chance that your drone will crash during the flight. Therefore, it is necessary to calibrate the IMU for your drone.
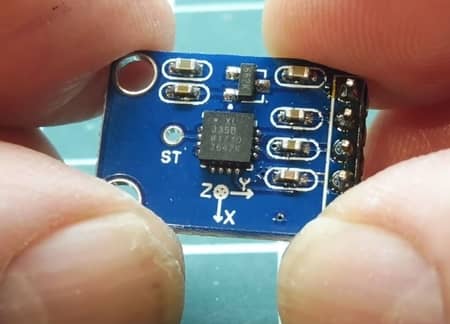
- The Accelerometer
As for the accelerometer, IMU calibration, will help restore the standards for attitude of the aircraft, and reduce errors caused by erroneous measurements of sensors. To calibrate an IMU, make sure that the surface on which you are going to perform this operation is perfectly flat. Do not move the aircraft during calibration.
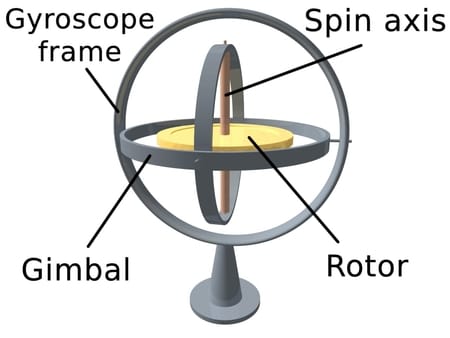
- The Gyroscope
A gyroscope is a wheel or a disc in which the axis of rotation is free to assume any orientation by itself. It is therefore used to determine the orientation changes. The calibration of the gyroscope makes it possible to measure and maintain the attitude of the aircraft, so that it can fly with the best possible stability.
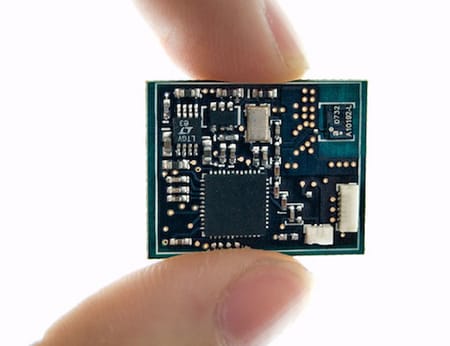
- The Thermometer
A thermometer detects the temperature of the aircraft and, over time, differences in aircraft temperature. Whenever you turn on your drone, the IMU should warm up to the temperature at which you calibrated it for the last time.
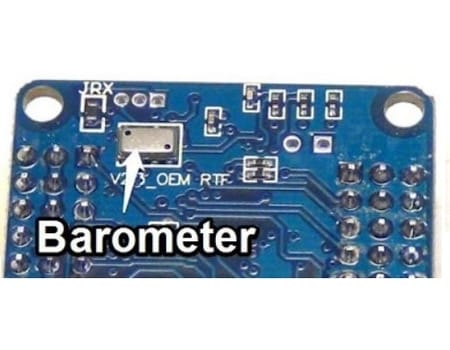
- The Barometer
On a DJI product, the barometer measures changes in altitude. If you experience drops or variations in altitude during the flight, it may prove necessary to calibrate the IMU so that the barometer restarts and resume normal operation.
DJI Phantom 4 IMU Calibration Procedure
| DJI Phantom 4 IMU Calibration Steps: |
|---|
| 1 Step: Place the DJI Phantom 4 Pro on Flat Surface |
| 2 Step: Connect RC & Open DJI Go App |
| 3 Step: Follow the Settings |
| 4 Step: Power the DJI Phantom 4 |
| 5 Step: Calibration Complete / Restart The DJI Phantom 4 |
1. Preparation Before The Calibration Process

1. Cool Down The Phantom 4 Pro
During calibration, the Phantom 4 becomes very hot. So, the first thing we want to do is to make sure that we cool down the DJI Phantom 4 battery by removing it from the drone. Let battery to cool down for at least 20 minutes.
2. Make Sure The Battery is at Least 50% Charge
Check if your Phantom 4 battery is charged at least 50% before you start calibration. This is very important step before you start the process because you don’t want the IMU calibration to fail because the lack of power.
2. IMU Calibration Process For Phantom 4

1. Place the DJI Phantom 4 On Flat Surface
To start the IMU Calibration procedure you first need to choose a flat surface for your DJI Phantom 4 drone. Find perfectly level surface. You can use your mobile app for that. If you calibrate your Phantom 4 on the uneven surface it will wrongly adjust its sensors.
Note: it is necessary to remove the propellers before calibration procedure.
2. Connect RC & Open DJI Go App
Next step is to connect the Remote Controller with your mobile device. Turn on the RC and open the DJI Go App. Then start the Phantom 4, and tap at “Camera” settings in the DJI Go App even though the Phantom 4 is not connected yet.
3. Follow the Settings
Once the live-view is up and running you must tap at the quadcopter icon to open up the “Main Controller Settings” menu and then tap on “Advanced Settings” and next we tab add “Sensors”.
4. Power the DJI Phantom 4
Insert the battery into the DJI Phantom 4 and turn it on. Wait a 1 or 2 seconds to start. As the IMU gets warmed up, immediately after you switched the Phantom 4 ON, tap at “Calibrate IMU” and start calibration right after the drone is connected to your mobile device.
You will get the popup message that say “Calibration Requires Approximately 5 minutes”. Both IMU’s are being calibrated and calibration will take 5 to 10 minutes. Don’t worry if the camera tips over or changes its tilt angle.
5. Calibration Complete / Restart The DJI Phantom 4
When it’s reach 100%, you’ll get a popup message that says “Calibration Complete. Restart drone”. After the procedure is completed, just restart the DJI Phantom 4 and check the accelerometer and gyroscope value. If both of them are displayed green and values are close to 0 as possible, the calibration process is successful. Don’t forget to put on the propellers when you are finish.
Note: After you finish the IMU Calibration of your Phantom 4, it is recommended to do a Gimbal Calibration as well as Compass Calibration.
Related Article: Phantom 4 vs Phantom 4 PRO: Full Review
DJI Phantom 4 Gimbal Calibration Process
- Open the DJI Go App and tap on the “Gimbal Settings” icon
- Next step is to click on “Gimbal Auto Calibration” and confirm it with “OK”
- Gimbal Calibration Process will appear.
- Phantom 4 will move and start the Gimbal process
- After the process finish, you will see popup message “Gimbal Calibrated”
DJI Phantom 4 IMU Calibration Notes
- IMU Calibration must be done on a very flat surface
- Drone propellers must be removed
- Stay away from metal objects during calibration because of magnetic field
- Charge your batteries at least 50% before starting
- Sometimes IMU Calibration need to be done more than ones
- Gimbal calibration must be done after IMU calibration
- Compass must be calibrated also
Here is the video that will show you everything about IMU Calibration for DJI Phantom 4:
How To Calibrate the Phantom 4 Pro IMU
The Phantom 4 Pro (p4p) has a significantly different IMU calibration than Phantom 4 model. During the calibration there are an additional 6 steps that you will need to follow to complete your Phantom 4 Pro IMU calibration. So let’s get started:
| DJI Phantom 4 Pro IMU Calibration Steps: |
|---|
| 1 Step: Place the DJI Phantom 4 Pro on Flat Surface |
| 2 Step: Connect RC & Open DJI Go 4 App |
| 3 Step: Follow the Settings |
| 4 Step: Complete The Six Steps Calibration Process |
| 5 Step: Restart DJI Phantom 4 Pro |
1. Preparation Before The Calibration Process
1. Cool Down The Phantom 4 Pro
Before you start IMU Calibration on your Phantom 4 Pro you need to remove the battery from your drone and let it cool down for at least 20 minutes so that no heating occurs.
2. Make Sure The Battery is at Least 50% Charge
Remember that your Phantom 4 Pro batteries need to be at least 50% charged to complete calibration. I recommend that you charge them on 100%.
2. IMU Calibration Process For Phantom 4 Pro

1. Place the DJI Phantom 4 Pro On Flat Surface
The IMU Calibration need to be done on the flat surface. Make sure that you don’t have no large metal objects near the drone because it can distract calibration according to the magnetic fields. You can use mobile App for finding a perfect level surface. Don’t forget to remove the propellers before starting the IMU calibration process.
2. Connect RC & Open DJI Go 4 App
First step is to connect your Remote controller with your mobile device and open the DJI Go 4 App. Go to the menu by clicking on the three dots that are placed in top right corner and tap “General Settings”.
3. Follow the Settings
Once you have open the General Settings Menu, tap the first icon in the form of a quadcopter that is on the top of the screen. Now scroll down, find and tap on “Advanced Settings” and then click on “Sensors”. Now you will find the “Calibrate IMU” button, on which you need to click. A new popup will open where it says “Start Calibration”. Confirm that.
General Settings Menu -> Advanced Settings -> Sensors -> Calibrate IMU -> Start Calibration
4. Complete The Six Steps Calibration Process
Now you have six steps (with pictures) that you need to follow on your mobile device which are shown through pictures. These steps include that your Phantom 4 Pro must be leaning on the left and right side, with the nose pointing down, nose pointing up and the final step is to place Phantom 4 upside down.
5. Restart Phantom 4 Pro
Once you are done with all these six steps above, you will get popup message “IMU Calibration Complete”. As a confirmation you will receive green check mark. You need to restart your Phantom 4 Pro and turn it on. Don’t forget to return the propellers to the drone after the calibration is completed.
DJI Phantom 4 Pro Gimbal Calibration Process
- Open the DJI Go 4 App and tap to „General Settings“
- Go to „Camera Settings“ and tap on „Auto Calibrate Gimbal“; a popup message „OK“ will appear
- Wait for Gimbal Calibration to finish and don’t move the aircraft
- After the process is finished you will see the popup message „Gimbal Calibration Completed“
DJI Phantom 4 Pro Compas Calibration Process
- On your RC open the DJI Go 4 App and tap to „General Settings“
- Then tap the first icon in the form of a quadcopter and go to “ Advanced Settings” that is located at bottom of menu
- Tap on „Sensor State“, scroll down and find where it says „Compass Calibration“
- Start your Phantom 4 Pro and turn it 360 degrees
- Next step is to flip your Phantom 4 Pro with nose down and rotate it again 360 degrees
- After you finish this process the lights will start blinking again which means that Compass Calibration is successful.
If you want more information about these calibrations for Phantom 4 Pro, you have an good video here to watch:
What To Do Before Phantom 4 IMU Calibration?
Before IMU Calibration there are few tips (steps) you need to follow if you want to perform optimal calibration for your DJI Phantom 4. Here are the small details you must follow to have better stabilization process:
- FLAT SURFACE: IMU Calibration must be done on a flat surface, for both models; DJI Phantom 4 and Phantom 4 Pro. This will help the drone to understands its positions during the flight and in windy weather.
- BATTERIES AT LEAST 50%: Batteries need to be charged at least 50% before the calibration process (advisable at 100%). This step is important because during IMU Calibration the drone will waste a lot of energy, and the process of calibration takes a 5 to 10 minutes.
- ALLOW THE DRONE TO COOL DOWN: This phase is important because the drone during the calibration records its temperature. The temperature must reach the ignition phase.
- DO NOT TOUCH THE DRONE: Avoid touching the drone during the calibration process, except for DJI Phantom 4 Pro that need to make position changes in 6 steps in a particular part of the calibration when the system requires.
Dual IMU & Dual Gyroscope on DJI Phantom 4
Did you know that DJI Phantom 4 is equipped with dual IMU (Inertial Measurement Units). This is the reason why Phantom 4 have a really good flight stability. When you go to DJI Go App you will have IMU1 and IMU2 calibration processes. These 2 processes are calibrated at the same time.
Can You Calibrate Your DJI Phantom 4 Inside?
Many drone pilots are not sure if they need to calibrate their Phantom 4 drone inside or outside of their home. The answer for this question is: it depends. If you are inside house where the environment is stable, you can do the Phantom 4 calibration.
However, if you are located inside the environment where you have a steel re-bars, they can cause the interference for your drone, and the calibration will fail. The best tip for inside calibration is that your IMU is at least 50 feet away from any steel. Also, take into account electronic gadgets that you have in your house such as cellphones, TV’s or iWatches.