
|

Yuneec Typhoon Q500 4k Firmware Update

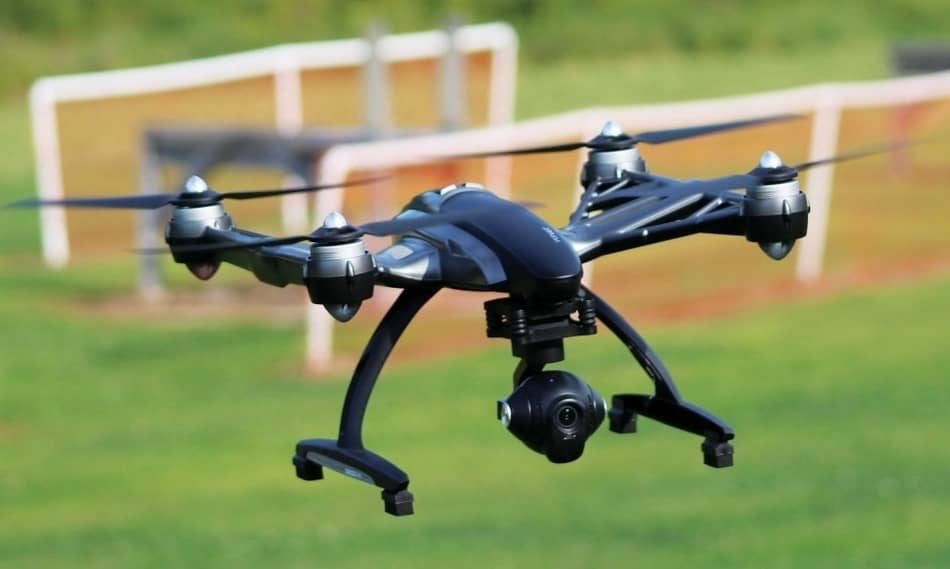
Yuneec Typhoon Q500 Flight Modes

We have already mentioned many times on this blog how important it is to perform regular firmware updates. Therefore, updating Typhoon Q500 4k firmware will give new features to your drone and in some cases fix software bugs.

If you have never done a firmware update before, in this article we will guide you through how you should do it. Once you make the update for the first time, you will be ready for each new update on your Typhoon 4k drone and ST10 remote controller. So, let’s start!

⚙️ QUICK ANSWER Updated for 2026

How do you update the firmware on a Yuneec Typhoon Q500 4K?

The Q500 4K has three separate firmwares that update in different ways. The aircraft updates over USB using the Q500 GUI software on a PC or Mac. The ST10+ controller updates from a microSD card — copy the Firmware folder and update.zip to the card root, never extract update.zip, then run Radio Control Update followed by System Update. The CGO3 camera updates from its own microSD card with a single .bin file at the root. Allow about an hour for all three, keep every battery above 50%, and format cards as FAT32.

🧩
Firmwares
3 separate
drone, ST10+, camera
💾
Card Format
FAT32
files at root
⏱️
Time Needed
~1 hour
all three combined
🔗
After Update
Re-bind
drone to ST10+

Updating a Yuneec Typhoon Q500 4K is more involved than updating most drones, and the reason catches almost everyone out the first time: it is not one update, it is three. The aircraft, the ST10+ controller and the CGO3 camera each carry their own firmware, and each one installs a completely different way.

Once you have done it once the whole thing takes under an hour. This guide walks through all three procedures in the right order, covers the file-placement rules that cause most failed updates, and explains what to do when the ST10+ simply refuses to see your update files — which is the single most common problem with this drone.

Three Firmwares, Three Different Methods

Start here, because understanding the structure prevents most of the confusion.

ComponentUpdate methodWhat you needRoughly how long
Aircraft (Q500 4K)USB connection to a computerQ500 GUI software, USB stick and cable15–20 minutes
ST10+ controllermicroSD card, run from the controller menumicroSD card formatted FAT3215–20 minutes
CGO3 cameramicroSD card inserted into the cameramicroSD card, single .bin file5–10 minutes

The order matters less than people think, but doing the aircraft first, then the controller, then the camera keeps things tidy — and it means the final step, re-binding, happens once at the end rather than repeatedly.

One thing worth knowing before you begin: the Q500 4K is a mature platform, and firmware releases stopped years ago. You are almost certainly installing the final versions rather than chasing a stream of updates. That is fine — the goal is getting all three components onto matching, stable builds.

Checking Your Current Firmware Versions

Before changing anything, note what you are running. If something goes wrong, knowing your starting point is genuinely useful.

ComponentWhere to find the version
ST10+ controllerSystem Settings, then About
AircraftShown in the Q500 GUI software once connected
CGO3 cameraTake a photo and check the EXIF data, or query the camera over its WiFi connection

The camera one is the awkward one, and the EXIF trick is the easiest route. Take a still photo, open the file properties on a Windows machine and look under Details, and the camera firmware version appears there.

What You Need Before You Start

RequirementDetailWhy
Aircraft battery50% minimum, ideally fullA shutdown mid-update can corrupt the installation
ST10+ battery50% minimumThe controller reboots during its update
microSD cardFormatted FAT32, several GB freeOther file systems are not read reliably
Card readerOr an SD adapterTo copy files from your computer
USB stick and cableThe ones supplied with the droneNeeded for the aircraft update
Computer with internetWindows or MacQ500 GUI software plus downloads
TweezersSmall pairThe aircraft’s update port is awkward to reach
PropellersRemovedSafety while the aircraft is powered on

The tweezers are not a joke. The firmware update connector on the airframe sits in a recessed slot, and getting the cable seated properly without them is genuinely fiddly.

How to Update the Q500 4K Aircraft Firmware

The aircraft is the only component that updates over USB rather than from a card.

Aircraft Update Procedure

  1. Download and install the Q500 GUI software for Windows or Mac from Yuneec’s Q500 4K download page.
  2. Download the aircraft firmware from the same page, under the drone firmware section. Read the release notes so you know what is changing.
  3. Remove the propellers.
  4. Prepare the USB stick supplied with the drone. If the gimbal adapter wire is attached, remove it.
  5. Connect the update cable to the firmware update port on the airframe. Use tweezers to seat it properly.
  6. Connect the other end to your computer and power on the aircraft.
  7. Open the Q500 GUI software. It should detect the aircraft and display the current firmware version.
  8. Load the firmware file you downloaded and start the update. Do not disconnect anything or power off while the progress indicator is running.
  9. Wait for confirmation, then power the aircraft down before disconnecting.

If the software does not see the aircraft at all, the cause is almost always the cable seating rather than the software. Unplug, reseat firmly with tweezers, and try again before assuming a driver problem.

How to Update the ST10+ Controller Firmware

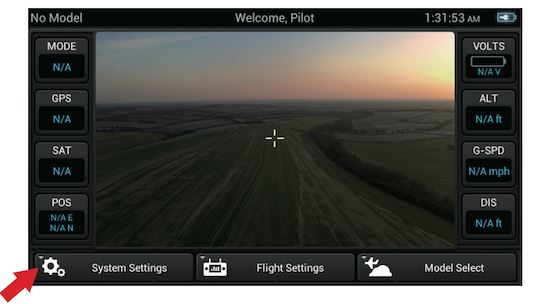
Yuneec ST10+ controller screen showing the System Settings, Flight Settings and Model Select buttons along the bottom bar
Fig. 1 — The ST10+ home screen. System Settings, bottom left, is where every part of the controller update lives.

This is the fiddliest of the three, and the file placement rules are absolute. Get them wrong and the controller reports that it cannot find an update — with no explanation of why.

Preparing the card correctly

File Placement Rules

  1. Format the microSD card as FAT32. Do this first, every time.
  2. Unzip the ST10+ download. You will get a folder named Firmware and a file named update.zip.
  3. Do not extract update.zip. It is the system firmware and must stay zipped.
  4. Copy both items to the card root — the top level of the card, not inside any folder.
  5. Do not rename anything. The Firmware folder contains tx and rf subfolders holding .bin files, and the controller looks for those exact names.

Two quirks worth knowing. First, the rf folder is sometimes empty — that is normal on some downloads and not a sign of a corrupt file. Second, if the controller refuses to see the update, a well-known workaround among Q500 owners is to reformat the card and place only update.zip plus the single tx .bin file on it, with nothing else. Stripping the card down to the bare minimum often makes the update visible.

Running the update

ST10+ Update Procedure

  1. Insert the prepared microSD card into the ST10+.
  2. Power on the controller and tap System Settings on the home screen.
  3. Tap About Flight Mode Control, then Radio Control Update.
  4. Select the tx .bin file and tap Update TX. Wait for it to finish.
  5. Select the rf .bin file and tap Update RF, if one is present.
  6. Tap Finish.
  7. Return to System Settings and tap System Update. This installs update.zip, the controller’s own operating system.
  8. Let it reboot. The controller restarts itself during this stage — do not power it off manually.

Those are two separate updates in one sitting. Radio Control Update handles the radio side; System Update handles the controller’s system software. Skipping the second step is a common reason people think the update failed when it partly succeeded.

How to Update the CGO3 Camera Firmware

The camera is the simplest of the three, and the one people most often forget entirely.

CGO3 Update Procedure

  1. Download the CGO3 camera firmware from the Q500 4K download page. It arrives as a single .bin file.
  2. Format a microSD card as FAT32 with more free space than the file.
  3. Copy the .bin file to the card root. Not inside a folder.
  4. Insert the card into the camera and power on the aircraft.
  5. Wait for the update to complete, then power cycle.
  6. Verify by taking a photo and checking the firmware version in the EXIF data.
The rule that applies to all three components: files go at the root of the card, never in a folder. The root is the top level — if you open the card and immediately see the file, you are in the right place. This single mistake accounts for the majority of “update not recognised” reports.

Re-binding the Q500 to the ST10+

Firmware updates can break the link between aircraft and controller, so re-binding is a normal final step rather than a sign that something went wrong.

Binding Procedure

  1. Power on the Q500. After about four seconds, tilt the airframe forward and back to level twice, until a flashing yellow light appears.
  2. On the ST10+, tap Flight Settings and accept the warning screen.
  3. Tap Bind. Your Q500 should appear in the model list.
  4. Select your model. A connection-established message appears.
  5. Tap the back arrow twice. The aircraft and controller are now linked.

If binding fails repeatedly after a firmware update, first confirm the aircraft firmware actually completed, then repeat the bind from a full power cycle on both units.

When the Update Is Not Recognised

ProblemLikely causeFix
ST10+ says no update foundFiles inside a folder instead of the card rootMove Firmware and update.zip to the top level
ST10+ still says no update foundCard format, or too many files presentReformat FAT32, load only update.zip and the tx .bin
Update fails partwayBattery dropped below the thresholdCharge fully and repeat the whole procedure
Q500 GUI does not detect the aircraftUpdate cable not fully seatedReseat with tweezers, check the USB stick adapter is removed
Camera update does nothing.bin file inside a folder, or card too smallReformat, place the .bin at the root
Controller connects but no videoCamera firmware mismatched with the restUpdate the CGO3 as well, then re-bind
Will not bind after updatingLink broken by the firmware changeFollow the binding procedure above from a cold start
Repeated failures on one cardFailing or incompatible microSD cardTry a different card — this is a common culprit

Where to Download Q500 4K Firmware

Only download firmware from Yuneec directly. Files from forums and mirrors carry real risk on a device that flies.

A practical note for 2026: Yuneec’s consumer drone business has contracted substantially since the Q500 was current, and support resources for this generation are thin. If you own one of these aircraft, download and archive the firmware files, the Q500 GUI installer and the PDF instructions now, and keep a local copy. Owners who waited have found pages moved or removed. A copy on your own drive costs nothing and cannot disappear.

The active Yuneec owner forums remain the best source of collective knowledge on this platform, and several of the workarounds in this guide originated there rather than in official documentation.

Mistakes to Avoid

Where Q500 Updates Go Wrong

  • Extracting update.zip. It must stay zipped. This is the number one ST10+ update failure.
  • Putting files in a folder. Everything goes at the card root, for all three components.
  • Renaming files or folders. The controller looks for exact names, including the tx and rf subfolders.
  • Formatting as exFAT or NTFS. Use FAT32.
  • Skipping System Update after Radio Control Update. Those are two separate steps and both are needed.
  • Forgetting the camera. Mismatched CGO3 firmware causes video problems that look like radio faults.
  • Starting with low batteries. 50% is the floor for both aircraft and controller.
  • Assuming a failed bind means a failed update. Re-binding after an update is normal.
  • Flying immediately afterwards. Power cycle, verify versions, then a short low hover before any real flight.

Done in order, the whole sequence is an hour of work you will repeat rarely, if ever again. Take the time to archive the files while you are at it, and this drone stays serviceable for as long as the hardware lasts.

About this guide: Procedures here follow Yuneec’s published update instructions for the Typhoon Q500 4K, ST10+ transmitter and CGO3 camera, cross-checked against long-running owner community reports for the file-placement quirks and the ST10+ workaround described above. The Q500 4K is a legacy platform and firmware development ended some years ago, so download links and support resources may change or disappear — archive your files locally. Always download firmware from Yuneec directly. Originally published in 2021, fully rewritten and expanded in 2026.

Frequently Asked Questions

Three, and each installs differently. The aircraft updates over USB using the Q500 GUI software, the ST10+ controller updates from a microSD card through its own menus, and the CGO3 camera updates from a card with a single .bin file at the root.

No. Leave it zipped. The update.zip file is the controller’s system firmware and must be copied to the card exactly as downloaded. Extracting it is the single most common cause of a failed ST10+ update.

Usually the files are inside a folder instead of at the card root, or the card is not FAT32. If it still fails, reformat and load only update.zip plus the single tx .bin file with nothing else on the card — stripping it down often makes the update visible.

The top level of the card, not inside any folder. If you open the card in your file browser and immediately see the firmware file without clicking into anything, it is at the root. This rule applies to all three Q500 components.

Yes, and it is the step most often skipped. Mismatched camera firmware causes video problems that look like radio or controller faults, so people spend hours troubleshooting the wrong component. It is also the quickest of the three updates.

Take a still photo and check the EXIF data. On Windows, open the file properties and look under Details — the camera firmware version appears there. You can also query the camera over its WiFi connection from a browser.

Firmware updates can break the link, so re-binding is a normal final step rather than a failure. Power on the Q500, tilt it forward and back to level twice until a yellow light flashes, then use Flight Settings and Bind on the ST10+ to reconnect.

The files remain on Yuneec’s Q500 4K download page, but this is a legacy platform and support resources for it are thin. Download and archive the firmware, the Q500 GUI installer and the PDF instructions to your own drive now rather than relying on the pages staying online.

Allow about an hour for all three components: roughly 15 to 20 minutes each for the aircraft and controller, 5 to 10 for the camera, plus re-binding at the end. Keep every battery above 50% so nothing shuts down partway through.

FAT32. Cards formatted as exFAT or NTFS are not read reliably, and reformatting is worth doing before every update attempt. If a card fails repeatedly despite correct formatting and file placement, try a different card — failing microSD cards are a common culprit.

Related Article: Yuneec Typhoon Q500 4k Review.

Subscribe
Notify of
guest
0 Comments
Oldest
Newest Most Voted