

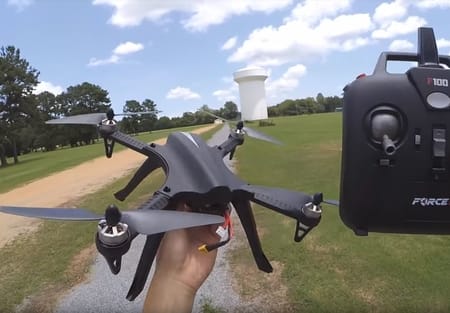
How To Fix A Drone? Tips And Solutions

Every electronic device breaks down from time to time. Drones (UAVs) are no exception! Most often, breakdowns are not fatal, many of them are completely capable to fix, without the help of specialists. In this article, we will talk about what are the most common causes of breakdowns when it comes to quadcopters (drones) and how to fix them.
Intro For Repairing Your Drone at Home
Even the smallest and cheapest drone is a technically complex equipment where failures occur. A radio-controlled quadrocopter (hexacopter, or a simple-looking drone) flies due to the coordinated work of hundreds of elements, and the failure of one small part gives a high probability that the drone will not take off at all. But if the Remote control technology refuses to carry out your commands, this does not mean that you need to immediately run to the repair shop or put an end to your drone. Before making a final diagnosis, try to eliminate all the simplest causes of malfunctions yourself.
Brief Summary of This Article:
- Basic Principles of Drone Flight
- The Most Common Drone Problems and Solutions
- Quadcopter Does Not Take Off – What to do?
- Drone Maintenance and Repair
- Fix Your QuadCopter (Full Guide)
The most common problems and failures with drones:
| Malfunction | Possible Reason | What to do? |
|---|---|---|
| The quadcopter (drone) does not communicate with the transmitter | The gas stick is in the wrong position | Lock the gas all the way to yourself and do not move the stick until the drone contacts the equipment |
| The indicator on the remote control goes out | The batteries are dead | Replace batteries |
| Extraneous noise during drone flight, excessive vibration | Damaged quadcopter (drone) housing and / or propellers | Identify the defect “by eye”, carefully align the damaged propeller or replace it |
| Electric motors work, but the drone does not take off | Screws not installed correctly | Check the marking of each propeller and install the screws according to the diagram in the user manual |
| Motor failed | Broken contacts or engine burned out | Check wires and contacts going to the engine and flight controller; if visually everything is fine, then there may be problems with the engine or controller |
| Quadrocopter (drone) reacts sharply to remote control commands | Probably expert mode selected | It is recommended to start flights with a mode for beginners; choose a pilot mode according to your skills |
| Quadcopter (drone) does not perform complex shapes | 1.Invalid flight mode 2. The drone battery is low | 1. Make sure expert mode is selected 2. Check the battery charge level, maybe the drone is just “not enough power” |
| Drone constantly "carries" in one of the parties | Incorrect calibration | Set the drone on a flat surface, make a lining of thin cardboard under the beam towards which the drone deviates in flight. Calibrate. The problem should disappear |
| Unstable flight | 1. Calibration problems 2. Low battery charge | 1. Place the drone on as flat a surface as possible and recalibrate. Perform additional trim if necessary 2. Charge the battery fully |
Basic Principles of Drone Flight
Modern drones can hardly be considered simple devices. Even the most inexpensive drone is equipped with a flight controller and a gyroscope. Advanced models have dozens of sensors on board, and miniature computers are engaged in the collection and analysis of information. And yet, if the aircraft suddenly starts pulling to the side, or it is not able to take off, then the reason is hardly worth looking for in electronics. Typically, a quadrocopter breakdown is not at all this.
Each drone (quadrocopter) is equipped with four screws (quad – four) constant pitch. A small motor of a collector or brushless type is installed under each screw. Two screws rotate counterclockwise and two screws clockwise.
The drone takes off and flies thanks to the engine thrust. A stable position in the air is provided by a gyroscope installed on board of the drone. As you can see, the basic principles of management are quite simple. And if, for example, after the take-off command, the drone does not manage to lift itself, then the problem is either in the screws or in the motors. Other components fail significantly less. Modern brushless motors are very reliable, so most likely something is wrong with the propellers . This can not be said about the collector engines, and you need to check in inexpensive drones not only the screws, but also the motors, which can also become a source of problems.
The Most Common Drone Problems and Solutions
Unlike airplanes or helicopters, drones are not only easier to operate, but also often easier to repair. Moreover, in some situations, repairs are not needed at all. Of course, it is hardly possible to cover all the existing problems of drones (quadcopters). All models are different, and although they are united by general principles of operation, however, electronic filling, intelligent modes, control settings sometimes differ dramatically. But you can give some general recommendations. For example, to suggest how the screws should rotate correctly, for which calibration of gyroscope is necessary, what to look for if the engines work jerky or do not work at all. So lets see the most common drone problems and their solutions.
1. Propellers Spin But Drone Does Not Take Off

A typical problem that beginners face is that the drone does not take off, although the propellers rotate regularly at increased power. Most likely, this is due to improperly installed propellers. Understanding how to properly install propellers on a drone (quadrocopter) is very easy. Check the markings on them, as well as the markings on the beams. They must match. Most likely, the propeller, which should rotate clockwise, was placed on a motor rotating counterclockwise (or vice versa). As a result, the direction of rotation of the screws turned out to be wrong. Because of this, the drone is not able to fly. Before disassembling anything or taking your drone for repair, once again check that the screws are installed correctly.
2. One or More Motors do Not Rotate

More difficult, but not hopeless, is the situation in which when starting the drone one or more motors do not turn on. This situation is typical for motors that are not highly reliable. However, it may not be the motor, but the banal wire breakage or poor contact. Wires often break after unsuccessful landings, while contacts can oxidize when exposed to moisture. Carefully inspect the idle motor and the wire going to it. If no visual malfunctions are detected, you can ring the motor circuit. If the ringing did not give anything, then you need to check the electric motor itself. Perhaps there was a short circuit, or a break occurred inside the case. A burned-out motor can sometimes be identified visually.
In the case of brushless motors, the breakdown may be due to a malfunction of the electronics. If the brushless motor does not start, then most likely the electronic speed controller (ESC) has failed. Connect to the serviceable motor the ESC that you want to check. A repeat of the problem indicates a malfunction of the controller. If the engine is working, then you have to check the electronic controller. Service may be required.
3. Extraneous Noise When Starting the Engine

The appearance of extraneous noise when starting the motor can be a sign of malfunction. It may well be that noises are generated not by the motors themselves, but by bent or deformed screws. The problem is easily solved by inspecting and repairing the propellers, or by replacing them.
Place the drone on a flat surface and carefully look at the propellers. If one or more screws are convex, most likely they are the source of noise. The curvature of the surface of the propeller leads to a decrease in lifting thrust, because the speed of the screw decreases. Balancing propellers will remove or significantly reduce the noise level. However, propellers are consumables, and they are easiest to replace. Worse if motor make noise. This may indicate that the failure is hidden inside the motor housing. In this case, the repair of the drone (quadrocopter) will consist in checking and replacing the motors.
4. The Drone Does Not Respond to the Remote Control

The lack of response to commands is often due to the fact that the remote control has run out of batteries or the battery is exhausted. If the signal indicator on the remote control does not light up, then with a high degree of probability the whole thing is in dead batteries. Accordingly, no repairs are needed. Just insert fresh batteries.
It also happens that the drone pilot incorrectly performs the sequence of actions, connecting the drone with the remote control. The instructions usually detail the steps that must be taken to initialize the drone. Sometimes the reason for the lack of reaction to commands is the incorrect position of the drone (the device is turned upside down or lies on its side). Some drones do not respond to the remote until they are mounted on a horizontal plane.
If replacing the batteries and correctly carried out the initialization procedure did not give results, then the problem should be sought in the wires and contacts, in other words, inside the remote control. Perhaps it’s all about oxidized batteries. In this case, you need to replace them and wipe the contacts.
5. Quadcopter Flies Unstably

An unusual situation is when, after takeoff, the drone heels sideways, behaves unstable in flight, does not hold a given point, deviates from the course, falls over for no apparent reason. Most likely, this is not a matter of electronics defects per se, but of unconfigured or incorrectly tuned gyroscopes and accelerometers. You must perform the reconfiguration following the instructions. Due to incorrect settings, the stabilization system is not working properly. If, after re-calibration, the drone heels sideways anyway, but not so much, then use the trimmers on the remote control. They will help level the drone. Incorrect gyro setup and pilot ignoring trim tabs are common mistakes.
6. The Drone Does not Fly Clearly in Smart Modes

Intelligent flight modes using GPS data may not work correctly if the drone has established communication with a small number of satellites. For example, in GPS premises, the signal is often often completely absent. In open space, the reason that electronics is not able to find a sufficient number of satellites is bad weather and significant cloud cover. All that remains to be done is to wait for good weather conditions. Otherwise, you risk damage to the drone. He may suddenly roll over, lose momentum, and crash. Another cause may be damage to the antenna of the GPS module. However, this type of malfunction is rare.
7. The Drone Does not Perform Acrobatics

Acrobatics are usually not available in training modes and modes for beginners. As a rule, it is necessary to switch to the mode for professional pilots, in which all flight restrictions are disabled and functions such as autopilot are deactivated. The instructions detail what functions and restrictions apply to the available flight modes.
Quadcopter Does Not Take Off – What to do?
This problem can happen sometimes, and it is not uncommon. A drone (quadcopter) does not want to take off while propellers are normally spinning! What to do? We must look for a reason! First of all, sit down, calm down, and if the quadrocopter used to fly, then think about what has changed since then. Here are some common reasons why a drone does not take off:
1st Case: Physical Damage Problem
Propellers fly off in a collision with furnishings. Worn on the axis of the motors, they can be in the bent or simply confused with each other. In this case, it is enough to install the new propellers as it should and the quadrocopter will fly. Just be careful when installing the propeller as there are A and B types that need to be fitted correctly.
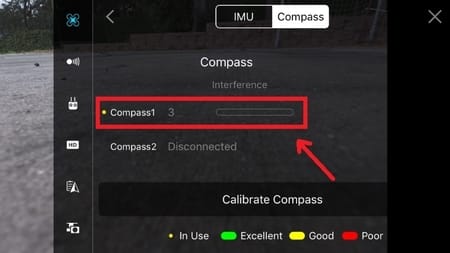
2th Case: A Malfunction in the GPS or Compass Problem
If the software settings indicate that reinforcement and take-off are possible only with a certain number of satellites caught or in the absence of error messages from the magnetometer, then it will not work. You can check this by connecting the quadrocopter to the computer and starting the software, try feeding (do not forget to remove the propellers first). See the error information and the flight controller setup page.
3th Case: A Calibration Failure
When you try to take off, the drone (quadrocopter) will crash or tumble. In this case, it is necessary to calibrate all equipment – a manometer, gyroscopes, as well as other, if any. Even small drones have a calibration mode, it enters a certain position of the sticks on the remote control when power is applied to the quadrocopter. Look for input information in the instructions for the quadrocopter or flight controller.
Drone Maintenance and Repair
If you take care of your drone regularly you will have no problems. Like everything else, drones also require maintenance and inspection from time to time. Doing so, you will drastically reduce the chances of your drone breaking down, saving you’re money and reducing the risk of falling. If you want to know what are the most common types of repairs for drones, keep reading to learn the main things so you’are be able to repair your drone yourself.
1. Inspect The Drone Before Each Flight
- Clean Your Drone
The drone should be cleaned from time to time to remove all dust and dirt from it. If dust is trapped inside the drone, it is not good for the circuit board inside the drone itself. Also one way to reduce dust intake is to avoid changing the lens in dusty conditions. Dust can be drawn very easily through the lens. So don’t forget to keep your drone clean. You do not have to disassemble it, just surface clean the visible parts that you think need to be cleaned.
- Replacing the Propellers
There is a general rule that states that after every 200 flights on your drone, you should change the propellers, even though they are not damaged. If you have trouble keeping track of the exact number of flights you have made, there are special applications that can help you see the exact number of flights you have made. Some of these applications are Skyward, Airdata UAV and Drone Logbook. With these apps you will have a better insight and know how many flights you have made. If you see any types of cracks on the propellers, it may be advisable to replace them immediately. You can do this by ordering from the manufacturer identical players or ordering them online.
2. Keep The Firmware Updated
It is advisable to check for the latest firmware before each flight. These updates are important for the hardware and for repairing any reported issues to make the flight safer. With each firmware update, it is advisable to remove the propellers from the drone so that some undesirable situations occur.
3. Buy An Extra Battery
When buying a drone, you usually get 1 or 2 batteries in the kit. It would be advisable to buy another extra battery to make sure you get the most out of your drone in an open environment. With each battery you know exactly how much flight time you can get. There are a situations where you want to make more use of your drone capabilities, and take some photos and videos for which you will need extra batteries. When you take weather facts such as temperature and wind they can affect flight time and battery load. This is why a couple of extra batteries are never bad to carry.
4. How to Store Drone Batteries
This is one of the very important things to know and understand when it comes to proper battery storage.
Here are some examples of how to safely store batteries:
- Batteries should be stored at room temperature and cold places should be avoided.
- Never overcharge batteries or allow them to charge overnight
- When it comes to traveling, keep batteries in the travel case for safety.
- Never hold the battery below 10% or the battery will lose full capacity.
5. Regular Maintenance of Drone Batteries
Batteries used in drones need to be properly maintained in order to have a long life as possible and to be in good condition. When using a drone, it is advisable to look from time to time the batteries if they show any sign of damage. If you notice something, they need to be replaced. If you also notice that your batteries drain faster than usual, it may be advisable to change them because they are likely to lose full capacity and are unreliable for flight, as voltage drops can occur and your drone may fall. There are also certain tools that can analyze the battery diagnostics in detail so they can accurately see the health of your battery and know when to replace them.
Fix Your QuadCopter (Full Guide)
Today’s drones are very fragile and sensitive, along with inexperienced pilots, they break down very easily. Therefore, we will go over and explain how to make some basic replacements on a drone such as broken propellers, defective LEDs, broken wires, and a few other things.
The equipment you need to repair your drone is:
- A pair of small screw drivers
- A pair of spare propellers
- Hot glue gun
- Clear tape
Step #1: The Problem of Bent Propellers

When using a quadcopter (drone) a very common problem is that you will bent propellers from time to time. This is because the propellers are made of soft material so that if the drone comes in contact with an object or a person they don’t do much damage. When the propellers bend, they make it difficult to lift the drone and they produce a strange buzzing sound, which causes a decrease in flying performance. To diagnose the problem, place your drone on the table and observe which propellers are exactly bent. When you have noticed which propellers are bent, try to straighten them slightly with gentle pressure if you can.
Step #2: Replacing Broken Propellers

If one or more propellers on your drone break or bend, be sure to remove them from the drone. Propeller replacement is required. When replacing, make sure that the propeller type is correctly replaced, as there are A and B propellers. These 2 types of propellers rotate in different directions, which gives stability to the drone during flight, and therefore need to be properly adjusted to the drone.
Step #3: Fix Battery Shorts Problem

Mini drones (quadcopters) have problems with moving batteries and circuit boards because they are easy to detach. If you find yourself in a situation where your drone will no longer charge, has a very short battery life or loses control while flying, it may be a problem with the battery short circuit. To solve this problem, you need to remove the case, take a piece of insulation and wrap it with a tight band around the battery to avoid short circuits.
Step #4: Re-Attach Broken Wires

If one of the propellers is no longer spining, you need to turn the quadcopter on and see carefully if the motor is turning. If you notice that this is a motor, it is necessary to check the insulation around the battery and see if the problem is a short circuit. If this is not the problem then you should check the wires from the motors that connect to the circuit board. If any of the wires is disconnected from the board, it is necessary to remove the soldering iron and solder them again to keep the wire in contact.
Step #5: Replacing the LED’s On Drone

If you find yourself in the position that some of LEDs drop from your drone, you need to replace it. The LEDs are very small (about 1mm in size), so you will have a hard time seeing them when flying out. Therefore, you will need to buy new LEDs that are very cheap and can be found in almost every electronics shops. The label of the diode on the back must be noted. Then use tweezers to carefully place the LED back on the contacts, using a soldering iron. After you have soldered the diode contacts and they have cooled down, turn on your drone and test the LED’s to see if they work before you fully assemble your drone.
Step #6: Replacing Screws On Drone

When you are replacing a screws on a drone you may notice that there are small amounts of silicone on the screws that need to be removed. After that it is necessary to put hot glue. Hot glue should be very HOT because it is not for you to tighten immediately. After attaching the clips to each individual rotor, then remove the screw and screw it in with hot glue before inserting it. This will help keep the screws from falling out during flight.
Step #7: Fixing Broken Clasps

If you find that the clasps that hold the housing of your drone are broken, the lower and upper parts can be connected very lightly with small elastic bands as shown in the illustration. These elastic bands should be more than enough to strengthened your drone and be ready to fly. Of course this is a temporary solution.
Step #8: Ready to Fly
 Drone Buying Guide")
If you followed these steps in this tutorial, your drone (quadcopter) should be ready to fly. This will save your money while learning how the drone works. Also, if you have any problems or are stuck at some step, feel free to leave a comment below.
